Reference
Installation and First Steps
Installation
IMPORTANT: If you have installed earlier versions of vbUnit3, please make sure to unregister them first before installing a new version.
Download the latest version of vbUnit3 Professional and run the setup program.
Walkthrough
After you ran the installer, open up the VB IDE. Figure 1 shows the vbUnit TestRunner window as a docked window in the VB IDE. If you installed vbUnit and the vbUnit window is not visible, click on Add-Ins / Show vbUnit Window:

Figure 1: The integrated TestRunner interface
Now we are ready to take vbUnit3 for a testdrive. Open the project vbUnit3\TestVBUnitFramework\TestVBUnitFramework.vbp.
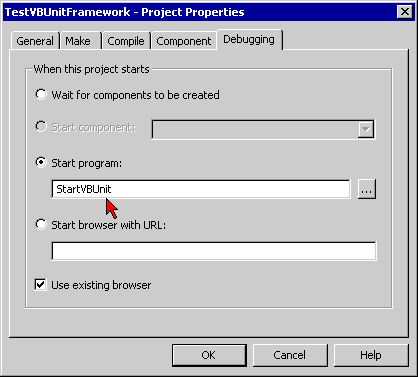
Make sure that the debug mode is set to load the file "StartVBUnit" upon start (New to 3.06.01: The installer will set the path to vbUnit3\bin, so you don't have to verify the path anymore):

Figure 2: Project Properties
Contrary to vbUnit2, there is only a single StartVBUnit.exe for all TestDlls, and it already exists. Setting the startup mode like that will allow you to run the tests in the debugger.
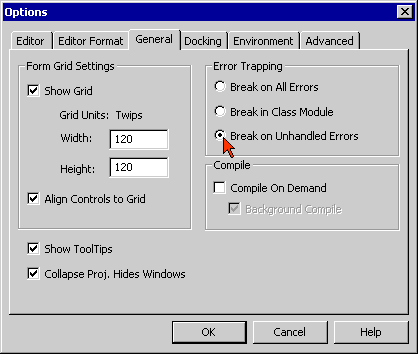
Before you start the debugger, make sure that the error mode is set to "Break on Unhandled errors". This is done in "Tools / Options / General":

Figure 3: Error Trapping (in Tools / Options / General)
Click on the "Run" button of the vbUnit window to run the tests in the debugger, or if the "run in debugger" box is not checked, to run the compiled tests. Note: If running the compiled tests, vbUnit will not automatically recompile your project, so make sure to recompile beforehand if necessary) .
If you are running tests in the debugger, you can set breakpoints and step through the code.
If you run the TestVBUnitFramework project, you should get the result OK (33 Tests, 160 Assertions) . This would indicate that you have correctly installed vbUnit3 and that it is running on your system (If you don't have the English version of VB6, some tests might fail due to localized error messages).
To see some failure results in the vbUnit window, open the file VBUnitTestSuite.cls and uncomment Line 38:
'VBUnitTestSuite.Suite

Private Function ISuite_Suite() As ITest
'vbUnitDefaultTestSuite  - this line causes the suite to be
'selected by default in the vbUnitAddIn window
Dim suite As New TestSuite
  suite.SuiteName = "Test of the VBUnit Framework"

  suite.AddFixture New TestObserver
  suite.AddFixture New TestVBUnit
  suite.AddFixture New TestBrokenFixture
  suite.AddFixture New TestManualBroknFxtr
  'include private TestSuite
  suite.AddSuite CreateObject("TestVBUnit3Priv.MainSuite")

'Uncomment the following to see some activity in the Results window
'and to play with the code highlighting feature:

  suite.AddFixture New TestHighlightCode


'Careful: Uncomment the following line if you want to see
'the TestRunner in action for quite some time:

' suite.AddSuite New LongRunningSuite

  Set ISuite_Suite = suite
End Function
Now run it again and see some failures in the results window. If you double-click on a TestResult, the corresponding place in the code will be activated.
Right-click into the results window to see the context menu. From here you can copy the test results or save them to a file. You can also open the vbUnit Options dialog to experiment with the various settings.
This tour should have given you a basic idea of the main features of vbUnit3. A good place to continue from here would be the vbUnit3 Tutorial.
